
Microsoft (Office) 365 with Outlook, SharePoint, and Teams are your organization’s bedrock. Moreso, with the WFH push of the pandemic. The business-critical data that they hold need to abide by legal and regulatory obligations. These requirements mandate both preserving information for a specific amount of time and ensuring that data is deleted after a specific time period. In this blog series, we explore Native Microsoft 365 backup. In Part 1 we covered the Office 365 Archive Policy and in this blog, we discuss the Office 365 Retention Policy and how to set it up using the Microsoft 365 Compliance Center.
How to Setup a Microsoft Office 365 Retention Policy: Watch the video or follow the instructions below

Get a Customized Backup Quote
What is the Microsoft (Office) 365 Retention Policy?
Retention policies and retention labels are used to prevent the permanent deletion of Office 365 data such as files, documents, or emails. They also ensure that information is stored in the company for the mandated period of time.
- The Office 365 retention policy is used to implement rules on all items and documents, with minimal exceptions.
- Retention labels allow customized settings for a single folder, document, file, and email. Retention labels can be applied both automatically and manually by users.
Note: You must have global admin permissions to manage both retention policy and labels.
How To Implement Microsoft (Office) 365’s Retention Policy Via The Compliance Center
There are two ways to implement Microsoft (Office) 365’s Retention Policies
- Using the Microsoft (Office) 365 Compliance Center
- Via Microsoft PowerShell
Create a Retention Label Via The Compliance Center
Step 1: Open the Microsoft (Office) 365 Compliance Center

Step 2: On the left navigation menu select Solutions / Information governance

Step 3: Open the Labels tab and then click on “+” to create a new label

Step 4: Fill out the Retention Label Settings and click next

Step 5: Define Retention Settings
- Specify the type of Retention – time-boxed, permanent, no-retention.
- Retention period – 5/7/10 years, or custom (specify the number of years, months, and days to retain items)
- Use different conditions or triggers:
- Date when the item was created, last modified, or labeled
- Employee activity
- Expiration or termination of contracts and agreements
- Product lifetime
- If you select Only delete items when they reach a certain age these options are available:
- The age is older than 5/7/10 years or a custom time period
- Use a trigger when items were either created, last modified or labeled

Step 6: Review settings
Click Create label

Step 7: Select how you wish to apply the label
Either publish it to Office 365, auto-apply to a specific type of content, or do nothing.

In this case, we apply it to PDF documents. You have to fill out the form using the wizard
- Give a name for the auto-label

- Enter the conditions and click Next. For example, use filetype:pdf to retain PDF files only. See Keyword Query Language (KQL) syntax reference for more detail about using conditions.

- Select the locations to apply the policy

- Select a label to auto-apply. The label created in the previous step will be selected by default.

- Review the settings and click Submit

- Finally, you will see the confirmation that the policy was created. Click Done to exit the wizard

Create Retention Tags in Office 365
Retention tags are crucial tools that help manage how long emails and folders are kept within Office 365. These tags provide a structured approach to applying retention settings, thereby ensuring compliance and effective data management.
Retention Tags Vs Retention Labels: When to Use What
Tags – Tags are applied to an entire mailbox or specific folders within it. When a tag is assigned, it sets retention policies for the folder (or “container”) and automatically applies those rules to all items contained within.
Labels – Labels are used to classify specific types of content. For example, sensitive documents like tax forms or TPS reports might require unique labels to meet different compliance or retention requirements.
Types of Retention Tags
Retention tags are categorized into three main types, each serving a distinct purpose:
- Default Policy Tag (DPT):
Applies automatically to all items in a mailbox that don’t have a more specific retention tag. This ensures that even overlooked items adhere to a basic retention policy. - Retention Policy Tags (RPT):
Designed for specific folders, such as the Inbox or Sent Items. This tag allows administrators to apply specific retention settings to key areas within a mailbox. - Personal Tags:
These are tags that users can apply themselves to individual items or folders. They offer flexibility by allowing users to manage their data retention according to personal or departmental requirements.
By using retention tags strategically, organizations can effectively control data lifecycle, streamline compliance, and manage storage costs within Office 365. Creating retention tags in Office 365 is a streamlined process that helps manage email retention based on your organization’s needs.
Here’s a step-by-step guide:
Step 1: Access the Exchange Admin Center
- Navigate to the Exchange Admin Center online.
- Find the Compliance Management tab and click on Retention Tags.
Step 2: Initiate Retention Tag Creation
- Click the arrow next to the plus sign (+) to reveal a menu with options for creating retention tags. You can choose from:
- Automatically Apply to Entire Mailboxes: This applies the tag universally across all mailboxes.
- Automatically Apply to a Default Folder: Targets specific default folders, such as the Inbox.
- Apply by Users to Items and Folders (Personal): Allows users to manually apply tags to specific items or folders.
Step 3: Configure Your Retention Tag
- After selecting a type from the menu, a new window will pop up.
- Enter a name for your tag, specify the retention action, and set the retention period.
- Click the Save button to finalize your tag settings.
Retention Action Options:
- Delete and Allow Recovery: Deleted items can be recovered up until the retention period ends, by relocating them to the Recoverable Items folder in Exchange Online. If set to zero days, items are removed permanently.
- Permanently Delete: Items are erased with no recovery option. However, if Litigation Hold is active, items will be preserved within parameters in the Recoverable Items folder.
- Move to Archive: Items are transferred to a user’s archive mailbox (if one is set up). If no archive is present, no action occurs.
By following these steps, you can efficiently set up and apply retention tags in Office 365 to manage your organization’s email data effectively. Always consider your company’s retention policy requirements before configuring these settings.
Create a Retention Policy via the Compliance Center
Step 1: Open the Microsoft (Office) 365 Compliance Center
Step 2: On the left navigation menu select Solutions / Information governance
Step 3: Open the Retention Policies tab and then click on “+” to create a new policy

Step 4: Enter the Retention policy’s name and description and click Next

Step 5: Select the objects that must be included in the Retention policy

Step 6: As with the Retention label, set the Retention Policy settings

Step 6: Review and Submit to create a new Retention Policy
 :
:
How to Add a Retention Policy to an Office 365 Outlook User
Implementing a retention policy for an Office 365 Outlook user is a straightforward process. Here’s a step-by-step guide to help you through it:
- Access the Exchange Admin Center:
- First, sign in to your Office 365 admin account. Once inside, navigate to the Exchange Admin Center.
- Locate the User:
- In the Exchange Admin Center, go to the Recipients section. Here, you’ll find a list of all users. Click on the user for whom you want to add a retention policy.
- Open the User Mailbox Settings:
- When you click on a user, a new window titled “Edit User Mailbox” will appear. This window allows you to modify various settings for the user.
- Set the Retention Policy:
- Within the “Edit User Mailbox” window, look for the Mailbox Features option. Click on it, and you’ll see a list of features related to the user’s mailbox.
- Choose and Apply the Retention Policy:
- Under the retention policy section, select the desired policy from the drop-down menu that appears. This should include any custom policies you’ve set up previously.
- Once you’ve chosen the correct policy, hit Save to apply the changes.
- Confirmation:
- You’ll receive a message confirming the changes have been applied successfully. Click OK to acknowledge.
By following these steps, you can efficiently manage and apply retention policies tailored to the needs of specific users, ensuring compliance and data management objectives are met.
How To Implement Microsoft (Office) 365’s Retention Policy Using PowerShell?
Create a Retention Label using Powershell
Step1: Open the Start menu and type “powershell” to find the Windows PowerShell application and select it to run

Step 2: Connect to the Security and Compliance Center
Connect-IPPSSession

You will get a message that the “Security & Compliance Center” module is loading

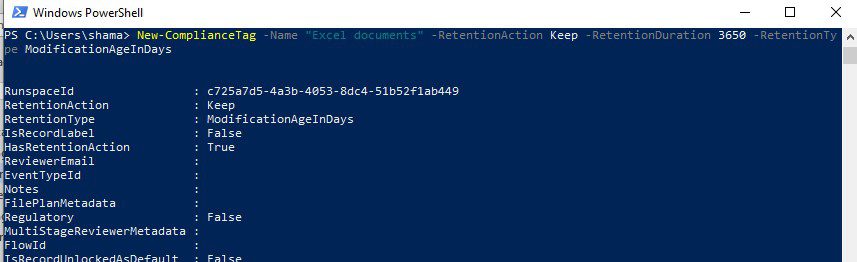
Step 3: Run the script to create a label
New-ComplianceTag -Name "Excel documents" -RetentionAction Keep -RetentionDuration 3650 -RetentionType ModificationAgeInDays
Where:
Name: the name of the label
RetentionAction – what to do for the label. We will keep it in our case.
RetentionType – specify the start of the retention period. We will start the period since the object was last modified ModificationAgeInDays
RetentionDuration – The duration to retain items (10 years or 3650 days in our example)
Create a Retention Policy using Powershell
Step1: Run the Windows PowerShell application

Step 2: Connect to the Security and Compliance Center
Connect-IPPSSession

You will get a message that the “Security & Compliance Center” module is loading

Step 4: Run the script to create a retention policy
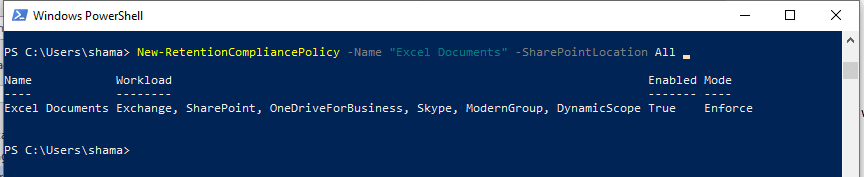
New-RetentionCompliancePolicy -Name "Excel Documents" -SharePointLocation All
Parameters:
Name – The name of the retention policy. If the name includes a space symbol then the string should be included in quotation marks, like “Excel Files”
SharePointLocation – URL of SharePoint sites where Excel files should be retained. “All” means retain items from all sites.
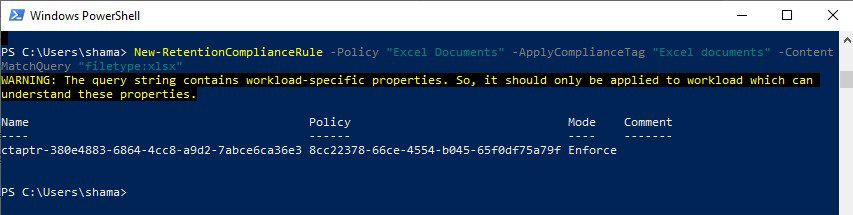
Step 5: Run the script to create a rule to retain Excel files for the policy created above:
New-RetentionComplianceRule -Policy "Excel Documents" -ApplyComplianceTag "Excel documents" -ContentMatchQuery “filetype:xlsx”
Parameters:
Policy – The name of the policy created in the previous step
ContentMatchQuery – The rule or query that will be used to filter items to be retained. For more information on using keywords, please refer to Microsoft’s Keyword Query Language (KQL) syntax reference
ApplyComplianceTag – The name of the retention label created above
How to Update the Retention Policy for Multiple Mailboxes using PowerShell
To update the retention policy for multiple mailboxes using PowerShell in Office 365, you’ll first need to identify the old policy applied to those mailboxes and then assign a new one. Here’s a step-by-step guide:
Preparation
- Connect to Exchange Online: Before running any command, ensure you are connected to your Exchange Online service using PowerShell. You can do this using the
Connect-ExchangeOnlinecommand. - Identify the Existing Policy: Determine the distinguished name of the current retention policy that you want to replace.
$OldPolicyDN = (Get-RetentionPolicy -Identity "Old-Retention-Policy").DistinguishedName
Applying a New Retention Policy
- Fetch Target Mailboxes: Use a filter to fetch all mailboxes that currently use the old retention policy.
$Mailboxes = Get-Mailbox -Filter "RetentionPolicy -eq '$OldPolicyDN'" -ResultSize Unlimited - Set the New Policy: Iterate over each mailbox and apply the new retention policy.
$Mailboxes ForEach-Object {
    Set-Mailbox -Identity $_.Identity -RetentionPolicy "New-Retention-Policy"
}
Considerations
- Permissions: Ensure that you have the necessary permissions to modify mailbox settings.
- Safety: It’s a good idea to back up your current configuration or maintain a log for future reference.
- Testing: Before implementing changes on a large scale, consider testing on a small group of mailboxes to verify that the policy application behaves as expected.
By following these steps, you can efficiently update retention policies across multiple mailboxes, helping to ensure compliance with organizational data management strategies.
Why Are Microsoft (Office) 365 Retention Policies Required?
Microsoft Compliance Retention Policies are a powerful tool to comply with legal and/or regulatory requirements for Microsoft 365 applications and their data types. When a retention policy is enabled, existing artifacts and all new data will remain secure in Microsoft 365 for the defined period of time.
Understanding Message Record Management (MRM) in Office 365 Exchange Online
Message Record Management (MRM) is a crucial feature in Office 365 Exchange Online that helps users organize and control the lifecycle of their email messages. It ensures that important communications are retained for legal and compliance purposes, while unnecessary emails are deleted, keeping your mailbox clutter-free and efficient.
Key Components of MRM
- Retention Tags:
- These are labels you can apply to emails or folders, dictating how long the items are retained before they are eligible for deletion.
- Tags can be varied, such as:
- Default Policy Tags (DPTs): Applied to entire mailboxes.
- Personal Tags: User-defined for individual emails or folders.
- Retention Policy Tags (RPTs): Specific to default folders like Inbox or Sent Items.
- Retention Policies:
- These are collections of retention tags that you can apply to entire mailboxes.
- They enable organizations to automate the deletion or archiving of messages that have aged beyond a certain period.
- Policies can be customized to meet specific organizational compliance and regulatory needs.
Benefits of Using MRM
- Compliance and Legal Readiness: MRM helps organizations adhere to legal, regulatory, and business guidelines by ensuring critical communications are preserved.
- Efficient Mailbox Management: By automatically archiving or deleting emails, MRM aids in reducing mailbox size, which enhances performance and storage management.
- User Empowerment: With personal retention tags, users have the flexibility to manage their emails according to personal or organizational needs.
In conclusion, MRM in Office 365 Exchange Online is an essential tool for managing email retention effectively, ensuring compliance, and keeping email communication streamlined and relevant.
How to Apply a Litigation Hold in Office 365
Applying a litigation hold is essential to preserve digital information for legal reasons. Here’s how you can set it up in Office 365:
- Access the Exchange Admin Center
- Start by navigating to the Exchange Admin Center within your Office 365 account.
- Navigate to the Recipients Section
- Once there, locate the ‘Recipients’ option on the dashboard. Click on it to view the list of user mailboxes.
- Select the User and Open Mailbox Settings
- Choose the user whose mailbox requires a litigation hold. This will bring up the “Edit User Mailbox” window.
- Enable Litigation Hold
- In the mailbox settings, find the ‘Mailbox Features’ tab. Within this section, look for ‘Litigation Hold.’
- Click on ‘Enable.’ Specify the duration for which you want the hold to be active (in days), and then save the changes.
- Disabling Litigation Hold
- If needed, you can disable the litigation hold by selecting ‘Disable’ under the same ‘Litigation Hold’ option.
Following these steps ensures that vital information remains preserved during legal proceedings.
Limitations of the Microsoft (Office) 365 Retention Policy
- If users or admins delete the data, it will override the retention policy and will be removed from Microsoft 365 applications. Note that these items will still be accessible using eDiscovery or the Preservation Hold library. As the Library is included in the site’s storage quota, you may need to increase your storage when you use retention settings for SharePoint and Microsoft 365 groups.
- An email or document can have only a single retention label applied to it at a time.
- For Exchange, calendar items are not retained, as are site looks/themes and related settings
- For SharePoint/One Drive, membership permissions, sharing, and access permissions are not preserved.
- For Teams/Groups, while chats are retained, chat attachments and Groups data not linked to SharePoint is not retained. No permissions, user membership, and metadata is secured with retention policies.
- Costly: The storage costs of retention can be significant crossing the 11TB limit of Microsoft 365. The costs can rack up especially if you are planning to use the Retention policies as backup – for a period of 3 years. That will require you to purchase additional storage even while incurring license upgrade costs to the most expensive Enterprise plan.
- Essentially, recovery is cumbersome with the Retention policy, thus defeating the very purpose of backup for quick recovery of lost data.
Third-party Backup For True Point-in-Time Restore
While Office 365 retention policies may work to adhere to compliance requirements and protect some sensitive data, they fall short when considered as a backup and recovery solution. Instead, a comprehensive Microsoft 365 Backup solution will secure all your Microsoft 365 data from loss – Mail, Calendar, Contacts, Tasks, Groups/ Teams, OneDrive, SharePoint, and Public Folders. While giving you the ability to recover data from any point-in-time or granularity level in minutes and ensuring regulatory compliance.
Start a free, full-feature 14-day trial – Zero setup and no credit card information required